 Mowo
Post-processing and volumes
Tonemapping, exposure, bloom, depth of field and grading, and how post-process volumes blend them by priority as the camera moves.
The post-processing chain turns the lit HDR image into the final frame: depth of field, motion blur, auto-exposure, bloom, tonemapping, color grading, lens flare and sharpening. Each scene has a baseline set of post-process values. Volumes override those values in regions of the world, or everywhere, and blend between each other as the camera moves.
The post chain
- DoF
- Motion blur
- Auto-exposure
- Bloom
- Temporal upscale
- Tonemap + grading
- Post-process material
- TAA
- Lens flare
- FXAA / CAS
| Effect | Notes | Main controls |
|---|---|---|
| Depth of field | Circle of confusion from depth; a separable gaussian below Epic, a circular bokeh disk at Epic and Cinematic | r.DoF.Bokeh (-1 tier, 0 gaussian, 1 disk) |
| Motion blur | Tile-based; uses per-object velocity when available. Off at Low. Skipped on a view's first frame, on a camera cut (a jump of more than 25 m or a turn past 90 degrees) and on the frame after a stall of more than 0.25 s, so a teleport or a load hitch never smears the picture. | r.MotionBlurObject (default 1) |
| Auto-exposure | Runs before bloom, so the bloom threshold works on exposed luminance | r.AutoExposure.* |
| Local exposure | Lifts shadows and holds highlights locally after lighting | r.LocalExposure (-1 scene, 0 off, 1 on) |
| Bloom | A mip chain of 4 to 6 levels depending on tier. Off at Low. | r.Bloom.Mips |
| Tonemap | See below | r.Tonemap |
| Color grading | Contrast, saturation, white balance, lift-gamma-gain, a 3D LUT, chromatic aberration, film grain | r.ColorGradingLUT (a .cube path; 1D and 3D files both load, a 1D curve is expanded to a 33-cube) |
| Vignette | Darkens the frame edges before the tonemap, like a lens. Intensity scales the darkening and is bounded, so the corners never fall below half brightness; the default is subtle. | Volume and scene settings |
| Post-process material | A PostProcess-domain material evaluated as a fullscreen pass after tonemapping | r.PostProcessMaterial |
| Lens flare | Screen-space ghosts and halo | Volume and scene settings |
| Sharpening | Contrast-adaptive sharpening in the final pass | r.Sharpness (percent) |
The project-wide defaults are on Project Settings > Engine > Post Process.
Tonemapping
r.Tonemap overrides the scene's operator:
| Value | Operator |
|---|---|
| -1 | The scene's setting |
| 0 | ACES (fitted curve) |
| 1 | AgX |
| 2 | Reinhard |
| 3 | Clamp |
| 4 | ACES reference transform with an output transform for the display () |
| 5 | A display LUT from r.DisplayLUT or the scene, a .cube file indexed in log2 stops around mid-grey; falls back to 4 without one |
For HDR displays, see Display, frame rate and HDR.
Exposure
Manual exposure is a multiplier, default 1.8. Turn on the physical camera in the scene's post-process settings to expose from f-stop, shutter time and ISO instead; the multiplier is then ignored.
Auto-exposure is on at every tier. Metering is average, spot, center-weighted or a histogram percentile window (r.AutoExposure.Metering). The variables below override the scene's values for testing:
| Variable | Meaning |
|---|---|
r.AutoExposure.EV | Compensation in stops added on top of the scene's |
r.AutoExposure.MinEV, r.AutoExposure.MaxEV | Limits of the adapted exposure in stops. Lower the maximum to stop a dark scene being lifted to grey. |
r.AutoExposure.SpeedUp, r.AutoExposure.SpeedDown | Adaptation rates toward brighter and darker scenes |
r.AutoExposure.LowPercent, r.AutoExposure.HighPercent | The percentile window for histogram metering |
The exposure limits belong on volumes in a real scene: a dark room can lower the ceiling and release it outdoors.
Accessibility
After the tonemap, r.ColorBlind.Mode applies color-vision correction (1 protanopia, 2 deuteranopia, 3 tritanopia) at r.ColorBlind.Strength. r.ColorBlind.Simulate previews the frame as a viewer with that deficiency sees it. r.DisplayGamma (1.8 to 2.6, default 2.2) re-encodes the SDR image for the player's panel.
Volumes
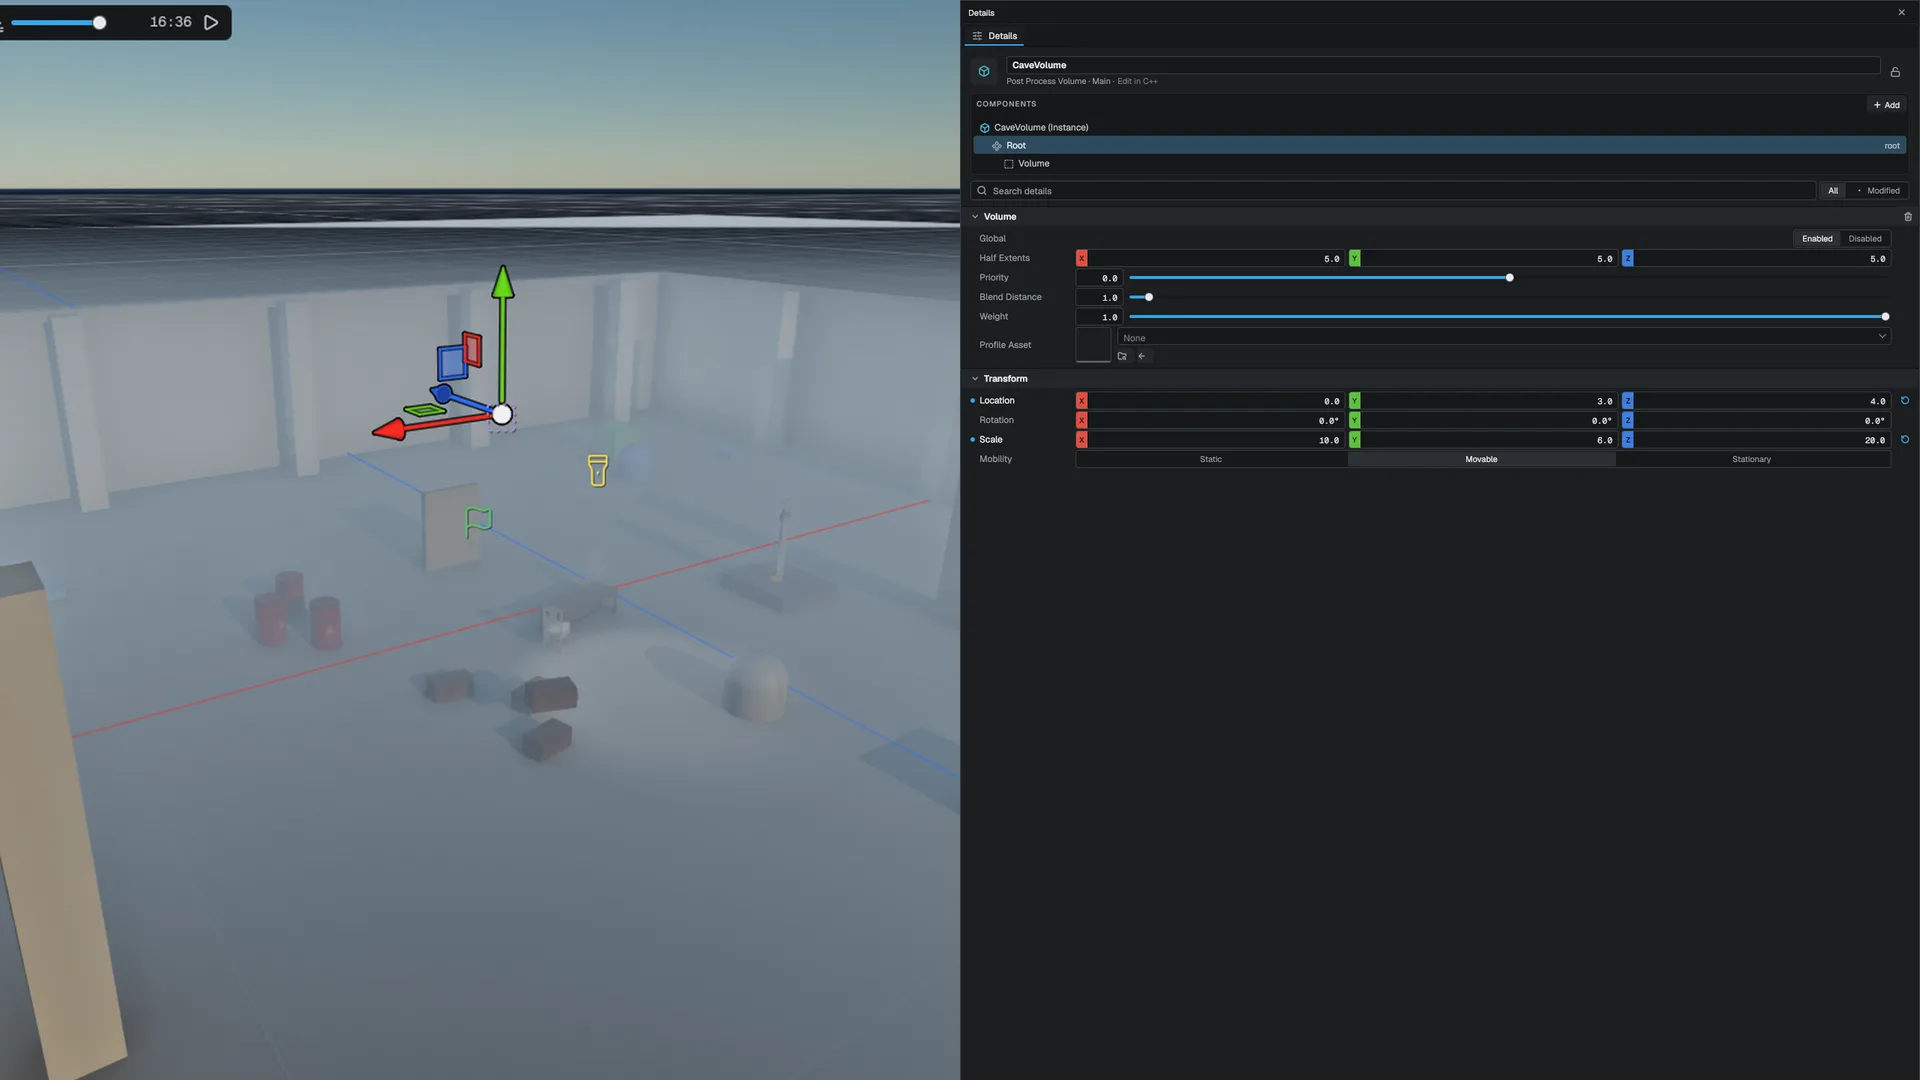
A volume is a zone that overrides post-process settings. Each setting in a volume profile is a slot with an override flag, and only the flagged slots change anything (VolumeProfile).
Place a volume
In the editor's Place Actors palette, the Volumes category has Post Process Volume (APostProcessVolume) and the generic Volume (AVolumeActor). They are the same actor: a post-process volume is a volume under the name Unreal users look for.
The volume component
| Field | Range | Meaning |
|---|---|---|
| Global | on/off | A global volume always contributes. A local volume contributes when the camera is inside its box or within its Blend Distance. On by default. |
| Half Extents | 0.1 to 1000 | Half-size of the box around the entity's position. Used only when not global. |
| Priority | -100 to 100 | Lower priorities blend first; higher ones override them. With equal priorities the later one wins. |
| Blend Distance | 0 to 50 | Distance outside the box over which the influence fades to zero, in world units. |
| Weight | 0 to 1 | A multiplier on the volume's influence. Animate it to crossfade two volumes. |
| Profile Asset | .mvolume | A shared profile. When set, it wins over the inline profile. |
How volumes blend
Every frame, for each camera, VolumeManager::Evaluate runs this sequence (VolumeManager):
- Seed from the scene's baseline
- Weigh each enabled volume at the camera
- Sort by priority, low to high
- Blend each volume's overridden slots
- Write the result to ScenePostProcess
- Numeric values (floats and colors) lerp toward the volume's value by its weight.
- Discrete values (switches, integers, the AA mode) snap to the volume's value when its weight is at least 0.5.
- The LUT path is discrete and the LUT strength lerps, so crossing between two LUT volumes crossfades the grade.
The renderer reads the blended ScenePostProcess at BeginScene, so it needs no knowledge of volumes.
What a profile can override
| Group | Slots |
|---|---|
| Tonemap and exposure | Tonemap on/off, exposure; auto-exposure metering, compensation, minimum and maximum EV, adaptation speeds, low and high percentiles |
| Bloom | On/off, intensity, threshold, clamp |
| SSAO | On/off, radius, intensity, bias |
| SSR | On/off, intensity, max distance, max steps, thickness, roughness cutoff |
| Anti-aliasing | Scene AA mode |
| Color grading | Contrast, saturation, temperature, lift, gamma, gain, LUT path and strength, post-process material path |
| Vignette, chromatic aberration, film grain | On/off and their parameters |
| Depth of field | On/off, focus distance, focus range, max blur |
| Motion blur | On/off, intensity, max velocity |
| Lens flare | On/off, intensity, threshold, ghost count, ghost spacing, halo radius |
Set up a post-process volume
- Place a volume
Drag a Post Process Volume from the Volumes category of the Place Actors palette into the scene.
- Choose global or local
Leave Global on for a scene-wide look. Turn it off, then set Half Extents to cover a room or area and Blend Distance for a soft transition as the camera approaches.
- Override the settings you want
In the component's profile, switch on the override for each setting you want to change, for example Bloom intensity or Saturation, and set its value. Everything you leave off falls through to the scene or lower-priority volumes.
- Set the priority
Give the local volume a higher Priority than your global volume so it wins inside its box.
- Share the profile (optional)
Save the profile as a
.mvolumeasset and assign it to Profile Asset on several volumes. Opening a.mvolumein the Volume Profile editor previews it in the viewport at full weight, above every placed volume.
Blend profiles in code
VolumeManager::Blend applies the same rules the renderer uses, so you can compute what a weight resolves to:
#include "Volumes/VolumeManager.h"
#include "Volumes/VolumeProfile.h"

Mowo::VolumeProfile result;

Mowo::VolumeProfile cave;
cave.bloomIntensity = Mowo::VolumeOverride<float>(true, 0.4f);
cave.saturation = Mowo::VolumeOverride<float>(true, 0.6f);
cave.vignetteEnabled = Mowo::VolumeOverride<bool>(true, true);

Mowo::VolumeManager::Blend(result, cave, 0.75f);

const float bloom = result.bloomIntensity.value;
const bool vignette = result.vignetteEnabled.value;

(void)bloom;
(void)vignette;
On disk, a profile stores only its overridden slots, so an empty profile is an empty node (FVolumeProfileSerialize).
API reference
- Volumes module:
VolumeManager,VolumeProfile,VolumeOverride,VolumeComponent,FVolumeProfileSerialize - Game module:
APostProcessVolume,AVolumeActor - Renderer module:
ScenePostProcess - SceneRenderer module:
FAcesOutputTransform
Engine sources
This page describes behavior implemented in these files of the engine repository, checked against commit df96684dd.
- Engine/Source/Runtime/Volumes/Public/Volumes/VolumeManager.h
- Engine/Source/Runtime/Volumes/Public/Volumes/VolumeProfile.h
- Engine/Source/Runtime/Volumes/Public/Volumes/VolumeProfileSerialize.h
- Engine/Source/Runtime/Volumes/Public/Volumes/Components/VolumeComponent.h
- Engine/Source/Runtime/Game/Public/Game/APostProcessVolume.h
- Engine/Source/Runtime/Renderer/Public/Renderer/RenderFrameData.h
- Engine/Source/Runtime/SceneRenderer/Public/Renderer/AcesOutputTransform.h