 Mowo
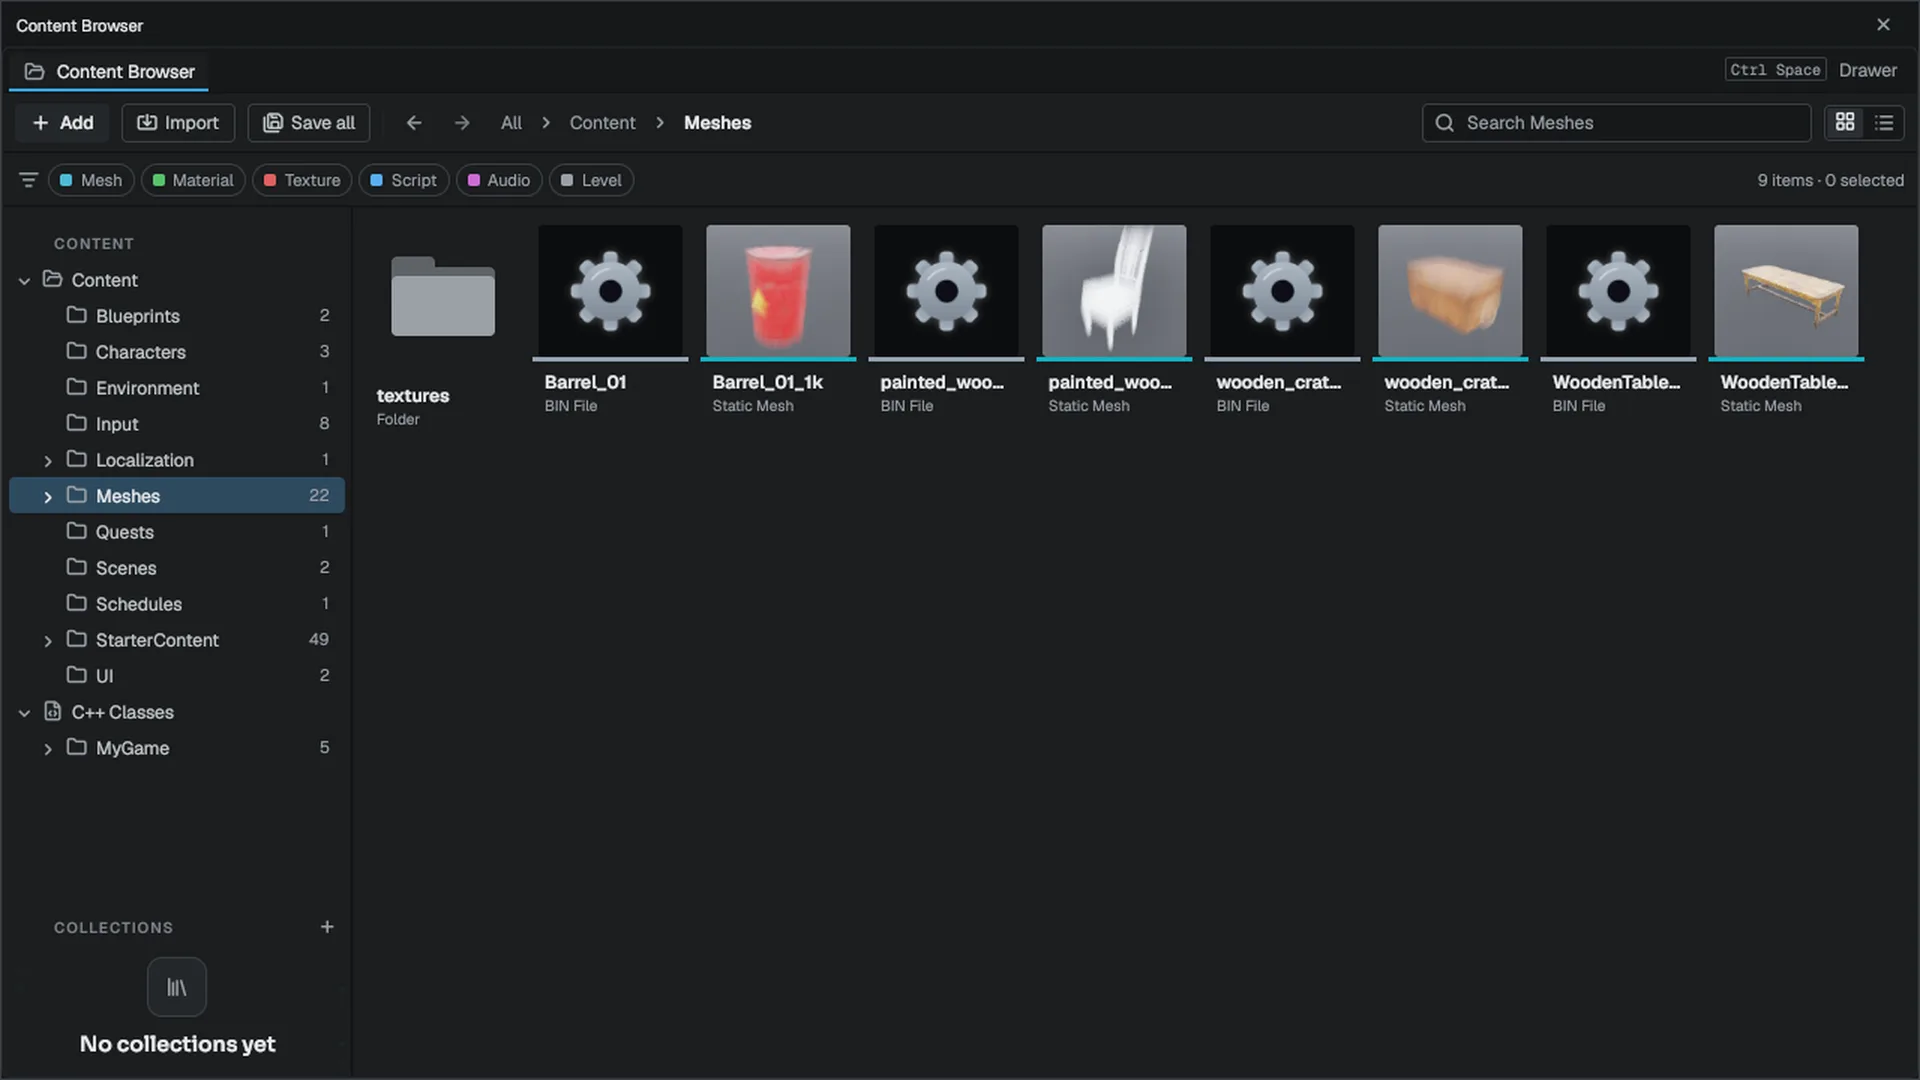
The Content Browser
Import, create, find and organize your project's assets, keep references intact with redirectors, use collections and migrate assets between projects.
The Content Browser is your project's asset library. The left side is the Sources rail with the folder tree and your collections; the right side is a grid or list of the assets in the current folder. Double-click an asset to open it in its editor, drag it into the viewport to place it, or right-click for everything else.
What the browser shows
The Sources rail has two sections:
- Paths: your project's
Contentfolder, a read-only C++ Classes root that mirrorsSource/, a Wolang Scripts root that mirrorsScripts/when the project enables Wolang, and the content of every mounted plugin under Plugins. - Collections: named sets of assets that cut across folders. See Collections.
Asset files live in Content/ and are committed with the project. Next to each asset sits a sidecar file with the same name plus .mdfmeta, for example rock.png.mdfmeta. The sidecar holds the asset's UUID and its import settings. The browser hides sidecars, and you should never delete one by hand: the UUID is how every other asset refers to this one.
Wolang Scripts
When the project enables Wolang (Project Settings ▸ Scripting), the Wolang Scripts root shows the project's Scripts/ folder: each script package is a folder holding its .wo files, and every engine class a file declares (class Enemy : AActor, class Health : MActorComponent) is listed beside it as a class item.
- Double-click a file to open it in your code editor, or a class item to open its file at the class.
- Drag an actor class into the viewport or the Outliner to place it; drag a component class onto the level with an actor selected to add the component to that actor.
- Right-click the root for New Wolang Package (a folder with its
wolang.tomland a first class); inside a package, New Wolang Actor Class, New Wolang Component and New Wolang Script write a file from a template and open it. - Rename a class item to rename the class in every script of the project; a
ClassRedirectsline inConfig/Redirects.inikeeps the instances levels already placed. - Find References on a class item lists the levels, actors, prefabs and scripts that name it on the Message Log's Scripts page.
- A file or package whose scripts do not compile carries a red ! badge; its tooltip gives the first error.
- Search filters the files and class items of the folder like any other.
Importing assets
- Open the destination folder
Select the folder in the Sources rail. Imports land in the folder the browser is showing.
- Start the import
Click Import in the toolbar, use Import… in the folder's context menu, or drag files from your file manager onto the editor window.
- Set the options
Models and textures open the import dialog. Audio files are copied in directly.
- Wait for the tile
Large models take a moment. The tile shows an Importing chip until the asset is ready.
Model sources (FBX, OBJ, glTF, GLB) and image sources (PNG, JPG, TGA, BMP, PSD, DDS, HDR, EXR and more) open the import dialog; audio sources are copied in directly. Anything else raises a warning naming the file. The full list of formats and what the importers do is in Content pipeline. If the browser shows no usable folder, a drop imports into the project's Content root.
Import options
The dialog has one set of options per kind. Save a set you use often as a named preset.
| Kind | Options |
|---|---|
| Model | Import scale, up axis, bake pivot to origin, LOD generation (count and reduction per LOD), build meshlets, import materials (new, or search a path), import textures, import skeleton |
| Texture | sRGB, generate mips, mip filter, max size, texture group, and optional height, normal and roughness map generation |
| Audio | Convert to .maudio, sample rate, channels, codec, loop, loudness, stream from disk or preload |
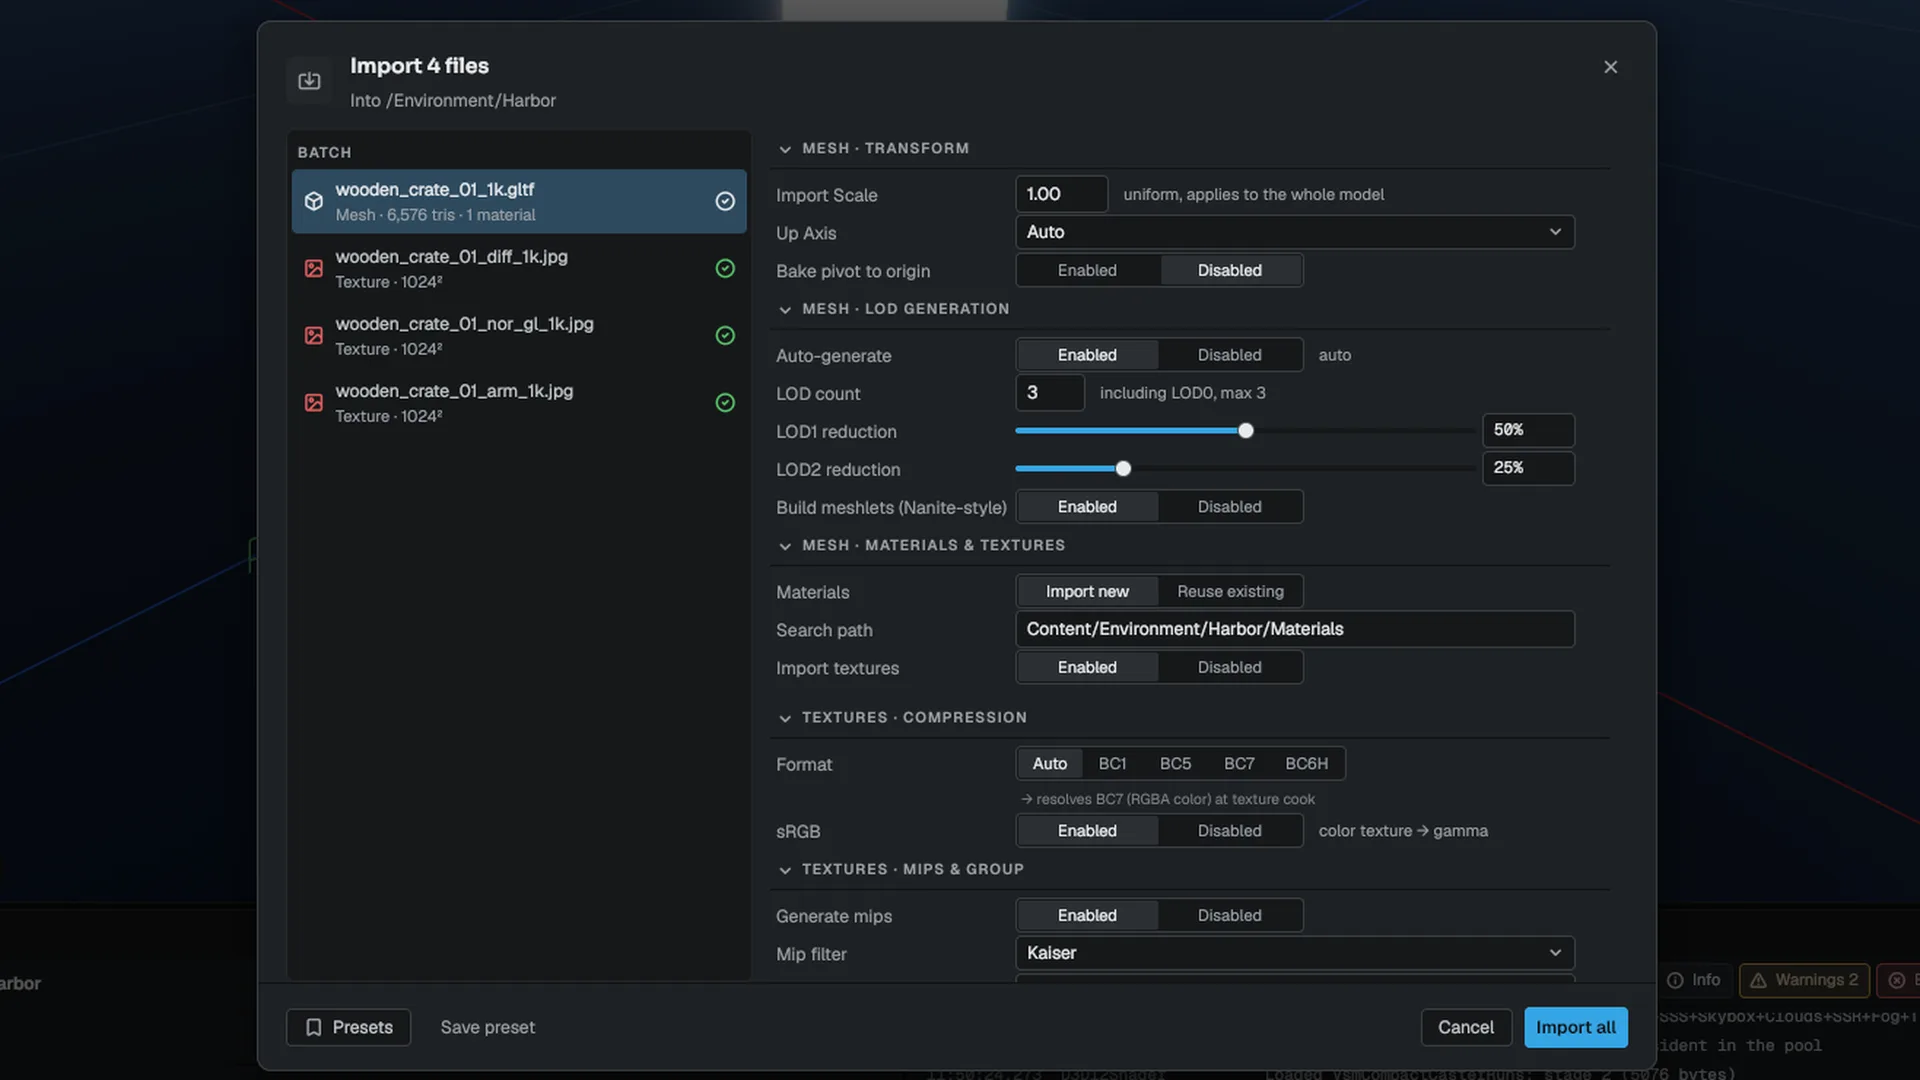
An import only counts as successful when both the asset and its sidecar reached disk. If the sidecar cannot be written, the copy is rolled back and the file is reported as failed. Failures raise their own notification.
Reimporting
Right-click an imported asset for three reimport actions:
| Action | Use it when |
|---|---|
| Reimport | The source file changed in place |
| Reimport From Original Source | You want to pull from the path recorded at import |
| Reimport With New File… | The source was renamed or replaced. The asset keeps its UUID, so every reference still works |
Creating assets
Click + Add in the toolbar, or right-click empty space in a folder. The menu creates new, valid assets of the types that have an editor, including Material, Visual Script Class, Animation Controller, Anim Montage, Pose Asset, Control Rig, Physics Asset, Particle System, VFX Graph, Sound Cue, MetaSound, Level Sequence, Arc Widget, Data Table, Data Asset, Curve, Input Action, Input Mapping Context, Behavior Tree and Smart Prop. It also creates some data-only types such as Quest, Dialogue, Item Definition and Environment Profile.
See Asset editors for what each editor does.
If you double-click an asset that no editor claims, a text file opens in a read-only text viewer (up to 512 KB) and a binary file raises a warning naming its extension.
Placing assets in the level
Drag a mesh (a source model or a cooked .mesh), a prefab (.prefab) or a Visual Scripting class (.vscript) into the viewport to spawn it at the drop point. Drop it on an Outliner row to spawn it attached under that actor. If a drop cannot place anything, the cursor shows it while you drag and a notification says why on release: the asset is not placeable, no level is open, or Play is running.
Organizing assets
Rename, move, copy
| Key | Action |
|---|---|
| F2 | Rename |
| Ctrl+D | Duplicate |
| Ctrl+C / Ctrl+X / Ctrl+V | Copy, cut, paste into the current folder |
| Del | Delete, with a reference check |
| Enter | Open |
| Backspace | Go to the parent folder |
| Space | Quick-look preview |
| Arrow keys, Home, End, Page Up, Page Down | Move through the grid; hold Shift to extend the selection |
The key handling lives in. The asset clipboard is shared by every Content Browser instance, so you can copy in one and paste in another.
- Duplicate and copy give the new file a fresh sidecar and UUID.
- Cut and paste moves the file with its sidecar and keeps the UUID.
- With several assets selected, the menu offers Rename N Assets… (prefix, suffix, find/replace, numbering) and Move N Assets To…. Both show a preview of every change before touching disk, and each batch is one undo step.
Redirectors
When you move or rename an asset, the registry records a redirect from the old path to the new one, so assets that still name the old path keep loading.
- Move or rename asset
- Redirect old path → new path
- References still resolve
- Fix Up Redirectors
- References rewritten, redirect retired
- Rewrite the references
Right-click a folder and choose Fix Up Redirectors. It rewrites the old path inside every file that names it.
- Read the result
A redirect is only retired once every file that could name it was checked. Anything that could not be rewritten keeps its redirect and is named in the notification.
Run Fix Up Redirectors after a large reorganization and before you commit, so the project does not carry indirections forever.
Deleting safely
Before deleting, the browser asks the asset registry what references the asset. If anything outside the selection does, the confirmation lists the referencing assets (levels included) and offers Show References and Delete anyway.
Searching
The search box takes plain words and prefixes:
| Query | Matches |
|---|---|
rock | File names containing rock |
type:mesh or t:mesh | The asset type |
path:props or p:props | The full path |
collection:"hero props" or c:… | Everything in a collection |
-old | Excludes names containing old |
A search also looks beyond the current folder and lists matches from the whole tree with their folder shown. The filter chips narrow the grid by asset category.
Collections
A collection is a named set of assets, independent of folders. Membership is by UUID, so moving or renaming a member does not remove it.
| Kind | Membership |
|---|---|
| Static | An explicit list of assets |
| Dynamic | A saved search query, answered each time you open it |
| Scope | Stored in |
|---|---|
| Shared | Content/Collections/<Name>.collection, committed with the project |
| Local | Saved/Config/Editor/Collections/<Name>.collection, only on your machine |
The two locations come from.
- Create a collection
Click + on the Collections header and choose static or dynamic, shared or local. A new dynamic collection starts with whatever the search box holds.
- Add assets
Drag assets onto the collection row, or use Add to Collection ▸ on the asset menu.
- Nest collections
Drag one collection onto another. Shared and local collections cannot nest under each other.
Thumbnails
Tiles show live thumbnails for textures, audio waveforms, meshes (skeletal meshes in bind pose), materials, prefabs, levels, particle systems, physics assets, animation graphs, Arc widgets and sound cues. Every thumbnail is a square 256-pixel image, drawn at its own aspect ratio inside the tile, so it stays sharp at the largest tile size and at 150 % display scaling.
- Meshes, prefabs, physics assets and animation graphs are rendered in a preview scene of their own, lit by a fixed studio light rig. The camera looks from the same three-quarter angle every time and is placed so the asset fills the same share of the tile, whether it is a pebble, a tall pole or a whole building.
- Materials are drawn on a sphere. Decal, post-process and light-function materials are drawn on a flat card facing the camera instead.
- Textures are drawn at their own proportions, averaged down to the tile. Transparent areas show a checkerboard.
- Levels show a capture of the level viewport, described below.
The open level never affects a thumbnail: its lights, sky, fog, exposure, post-process volumes and Global Illumination stay out of the preview scene, so an asset looks the same in every level and every project.
Thumbnails are drawn a few at a time, so browsing does not stall the editor, and the tiles you can see are drawn before the ones you scrolled past. A tile is redrawn when its source file or one of its dependencies changes, for example a texture used by a material.
A tile is in one of four states: a finished thumbnail, a pending bar over the type icon, a red failed state, or the plain type icon when no thumbnail applies. To draw an asset's thumbnail again, right-click it and choose Refresh Thumbnail.
Level thumbnails
When you save a level, the editor captures the level viewport and stores the middle square of that picture beside the level as <Level>.mmap.mthumb. The level's tile shows that capture. Rename, move, duplicate and delete take the capture along with its level; commit it with the level so everyone on your team sees the same thumbnail.
To take a new capture without saving, open the level, frame the view you want and choose Update Thumbnail from the level's right-click menu.
A level that has no capture yet, such as one saved by an older version of the editor, gets one the first time you open it, once its assets have finished loading. Until then its tile shows the plain level icon.
The thumbnail cache
Drawn thumbnails are kept in memory for the tiles you have looked at recently and on disk in Intermediate/ThumbCache, so reopening a folder or the project does not draw them again. You can delete that folder at any time; the editor draws the thumbnails again as you browse.
Migrating assets to another project
Migrate… on an asset or folder copies it and everything it depends on into another project's Content/.
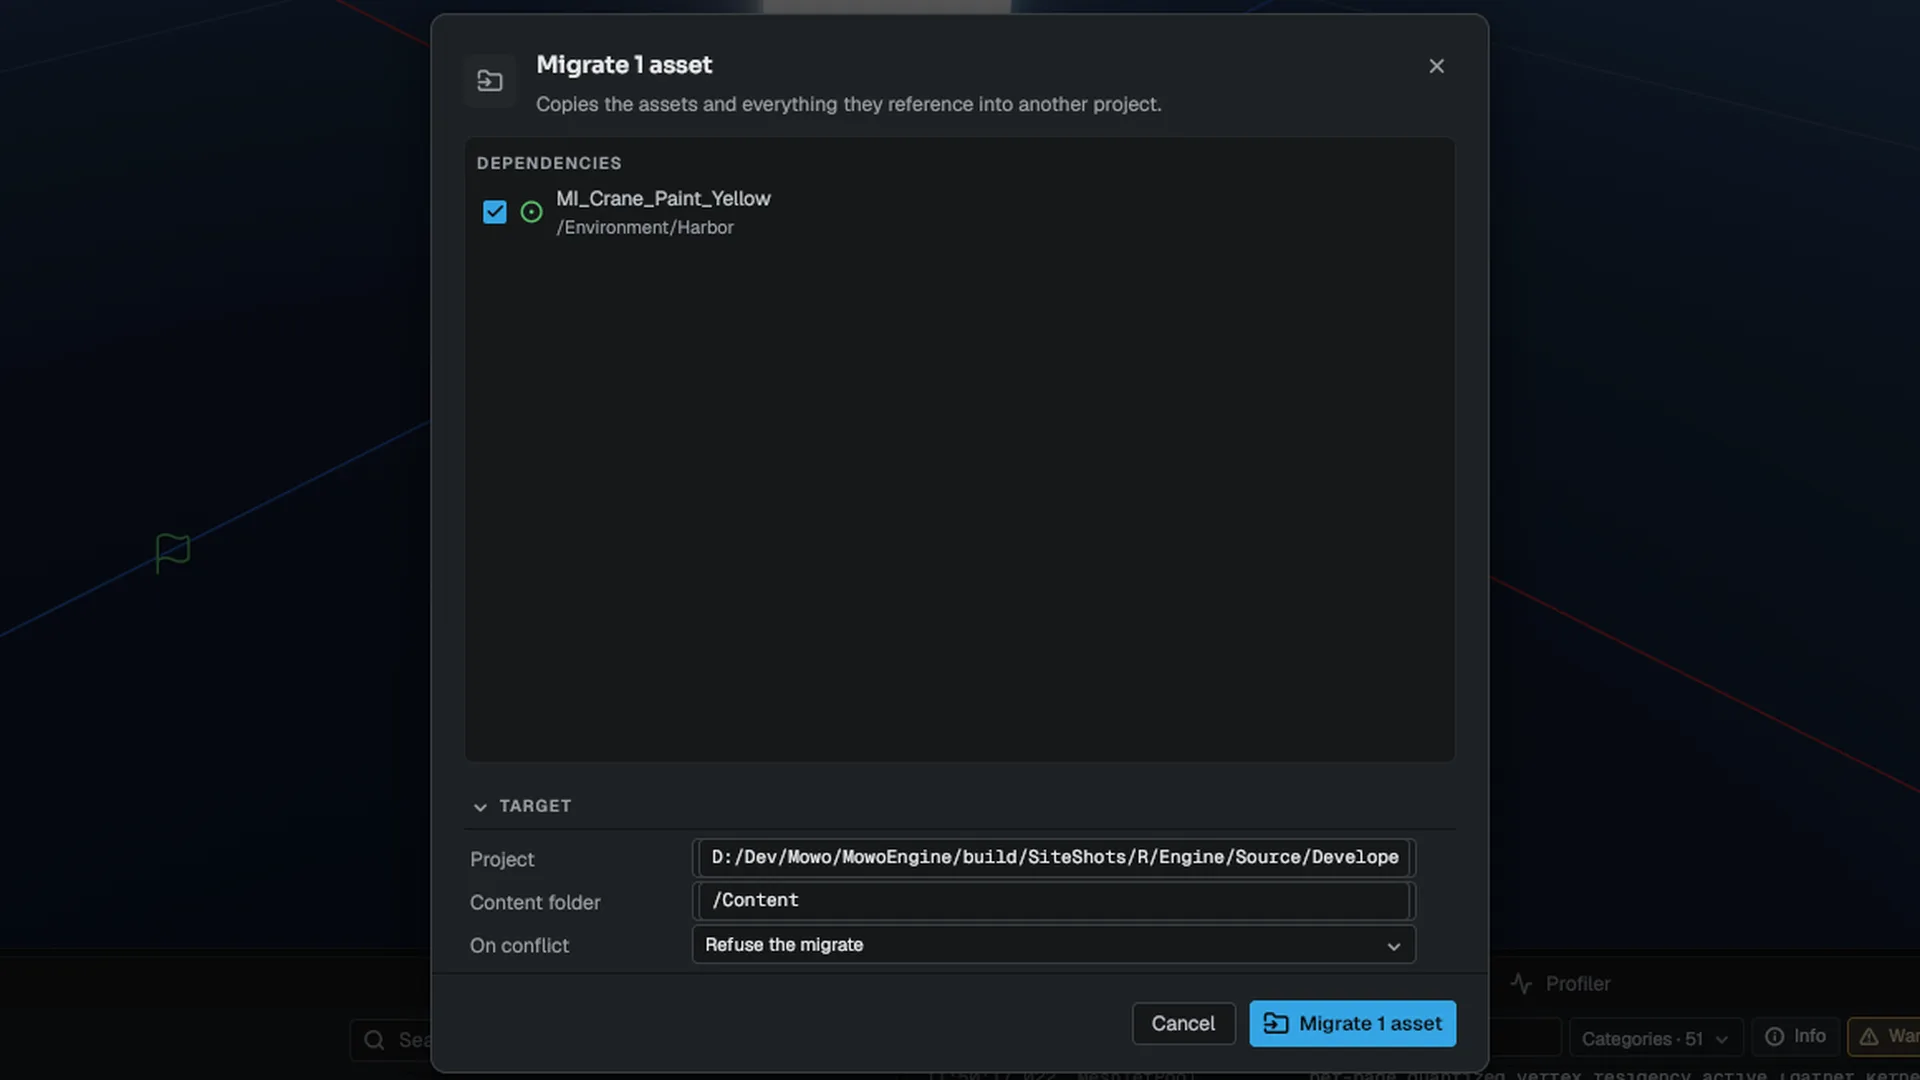
The dialog lists the dependency closure, one row per file. Untick a file to leave it out. Rows that cannot copy say why: already in the target, a different asset has this name in the target, or missing on disk.
| Target row | What it does |
|---|---|
| Project | The destination folder or .mproject; it starts on the most recently opened other project |
| Content folder | Where under the destination's Content/ the files land. /Content keeps every path as it is |
| On conflict | Refuse the migrate (the default) or Skip existing |
Each file travels with its .mdfmeta sidecar, so UUID references keep working. When you choose a sub-folder, the migrate also adds a package redirect per moved file to the target's Config/Redirects.ini; run Fix Up Redirectors there to rewrite the references. Under Refuse, a name collision with a different asset or a missing source file stops the whole migrate, so the target never ends up half-copied. An asset already present with the same UUID is skipped and reported. Only files under Content/ migrate. The result goes to the Message Log.
Source control state
When the project is in a git repository, tiles carry a letter for their state: M modified, A added, D deleted, ! conflicted, R renamed, ? untracked. Clean files show nothing. A file locked by someone else shows a lock with the owner in the tooltip. List view adds an SC column. See Source control.
Other asset actions
The asset context menu also has Reference Viewer… (what uses this and what it uses), Size Map… (disk cost, also on folders), Validate (runs the asset validators and reports to the Message Log), Migrate…, Copy Path and Show in Explorer. These tools are described in Asset tools.
Related
- Asset editors for what opens on double-click.
- Saving and recovery for how assets are written.
- Outliner and Details for asset pickers.
- API: AssetSystem.
Engine sources
This page describes behavior implemented in these files of the engine repository, checked against commit 7996072c5.
- Engine/Source/Runtime/AssetSystem/Public/Scene/ExternalActorFiles.h