 Mowo
Geometry tools
Block out and model level geometry in the viewport - parametric shapes, element editing, deformers, booleans, UV editing and baking to a mesh asset.
The Model rail mode (Modeling, Shift+2 in the viewport) is the editor's level-geometry tool. Drop a parametric shape into the level, then push its faces, edges and vertices around until the room is the shape you want. The geometry stays editable: it saves with the level, and a finished piece can be baked to a regular mesh asset. The tools live in the MowoEngine.GeometryTools module (API).
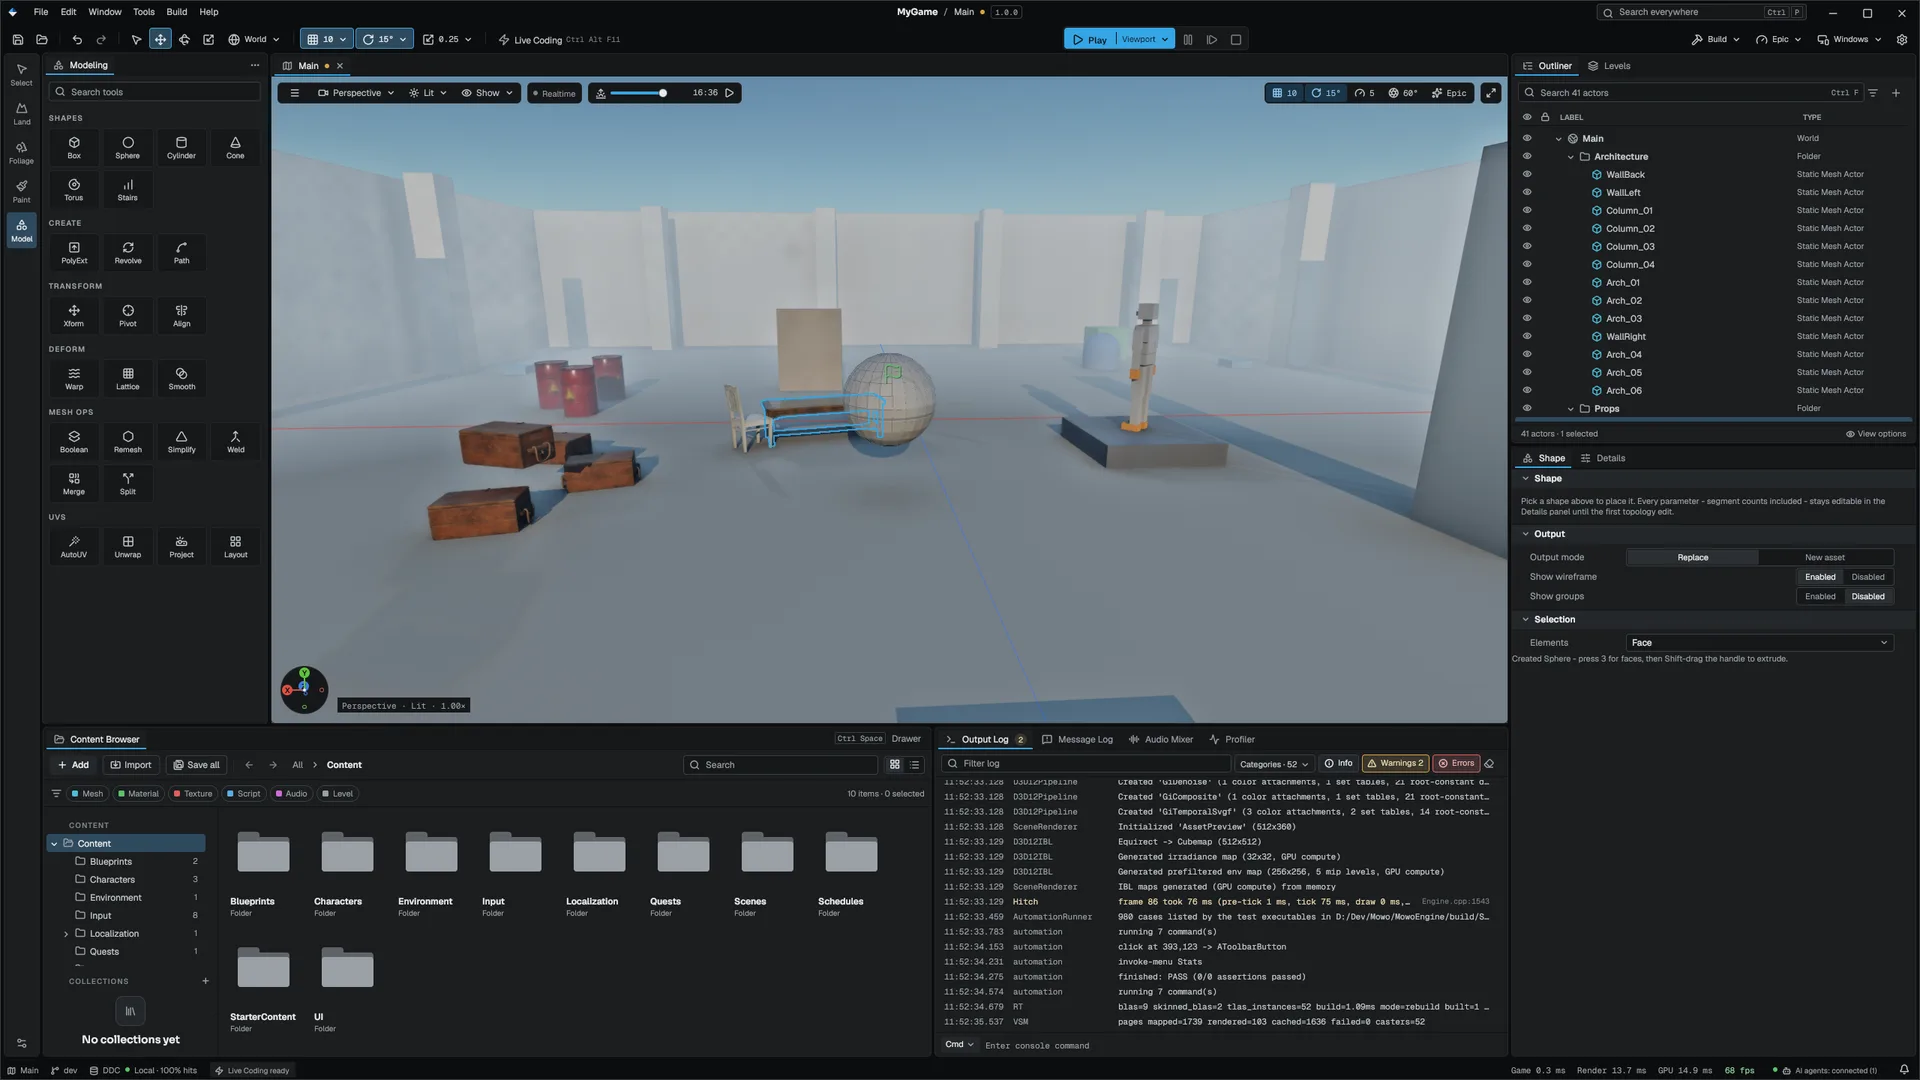
The Modeling panel
The panel shows a Search tools box over a tool grid:
| Group | Tools |
|---|---|
| Shapes | Box, Sphere, Cylinder, Cone, Torus, Stairs |
| Create | PolyExt (extrude), Revolve, Path |
| Transform | Xform, Pivot, Align |
| Deform | Warp (displace), Lattice, Smooth |
| Mesh ops | Boolean, Remesh, Simplify, Weld, Merge, Split |
| UVs | AutoUV, Project, Unwrap, Layout |
The remaining tools (Edit, Attributes and Output groups) are reached by typing in Search tools or from the panel's ··· menu. The selected tool's settings open as a tab in front of Details, with an Output section: replace the mesh or also write a new asset, and show wireframe or polygon groups.
Tools with parameters preview: picking one applies it at once without recording anything, and changing a number re-runs it. An accept bar in the viewport shows the change (for example a triangle count before and after); Enter accepts as one undo entry and Esc discards. Switching tools with a preview up asks Apply, Keep editing or Discard.
| Tool | What it does |
|---|---|
| Revolve | Sweeps the selected edges (or every open boundary) around an axis through the pivot |
| Path | Extrudes the selected faces in segments along an arc, with bend, twist and end scale |
| Xform | Moves, rotates and scales by typed values |
| Pivot | Moves the object's pivot to the bounds centre, bounds base or selection without moving the geometry |
| Align | Flattens the selection onto an axis, or moves it until a side touches the pivot plane |
| Boolean | Union, subtract or intersect with another selected shape; both must be closed solids |
| Remesh | Decimates toward a triangle budget, then relaxes the surface |
Shapes
Each shape regenerates whenever you change its parameters in Details Engine/Source/Runtime/GeometryTools/Public/GeometryTools/GeometryShapes.h:
| Shape | Main parameters |
|---|---|
| Cube | Size |
| Plane | Size, segments |
| Cylinder | Radius, height, segments |
| Cone | Radius, height, segments |
| Sphere | Radius, segments, rings, smooth shading |
| Stairs | Size, steps |
| Arch | Depth, radius, thickness, arc degrees, segments |
| Torus | Radius, inner radius, segments, rings |
| Pipe | Radius, inner radius, height, segments |
| Door | Size, opening width and height |
A shape stays parametric until the first operation edits its topology. Reset To Shape rebuilds it from the parameters and drops the topology edits, as one undo entry.
Editing elements
Press 1, 2, 3 or 4 for Vertex, Edge, Face or Object selection.
| Gesture | What happens |
|---|---|
| Click (Object) | The editable shape under the cursor becomes the target |
| Click (Vertex, Edge, Face) | Selects the element; Shift adds, Ctrl removes |
| Drag on empty space | Marquee select |
| Drag an axis handle | Moves the selection along that axis, using the viewport's translate snap |
| Shift + drag an axis handle | Extrudes, then moves the new cap: one gesture, one undo entry |
| Ctrl+R, hover, click | Previews and inserts an edge loop |
| K, then clicks | Knife: places cut points, snapping to vertices and midpoints. Click the last point again or press Enter to cut; click the first point to close the loop |
| L | Fits a lattice cage to the selection; drag control points to deform, or the amber handles to twist, bend, taper or bulge |
| Ctrl+A / Esc | Select all / cancel the current gesture, then clear |
Esc mid-drag puts the mesh back as it was. Leaving the knife takes two presses: the first throws the stroke away, the second disarms it.
The Edit group holds the topology operations: extrude, inset, bevel, bridge, subdivide, detach, delete, merge, weld, collapse, flip, and more. Each greys out when the selection cannot feed it. Every operation is one undo entry on the level's history.
Snapping
The Snap To setting decides what an element drag lands on Engine/Source/Runtime/GeometryTools/Public/GeometryTools/GeometrySnap.h:
| Mode | Candidates |
|---|---|
| Grid | The same snap step as the object gizmo |
| Vertex | Every vertex of every editable mesh, except the dragged selection |
| Edge | Every edge midpoint |
| Surface | Every face plane, so a dragged face comes out flush with a wall |
A marker shows when a drag snapped. With nothing in range, the drag stays free.
UVs and materials
Each face has a UV projection: Auto picks the axis plane the face points at most strongly, and Planar X / Y / Z pins one. Because projection reads world position, walls of different sizes tile at the same texel density. Project UVs writes the panel's projection, offset, rotation and scale onto the selected faces, and the material slot setting assigns a slot to them.
The UV Editor
The UV Editor is a document titled UV Editor · <mesh>. Open it with Open in UV Editor on a mesh in the Content Browser, Window ▸ UV Editor, or the Unwrap and Layout tiles. It edits the same target and face selection as the viewport.
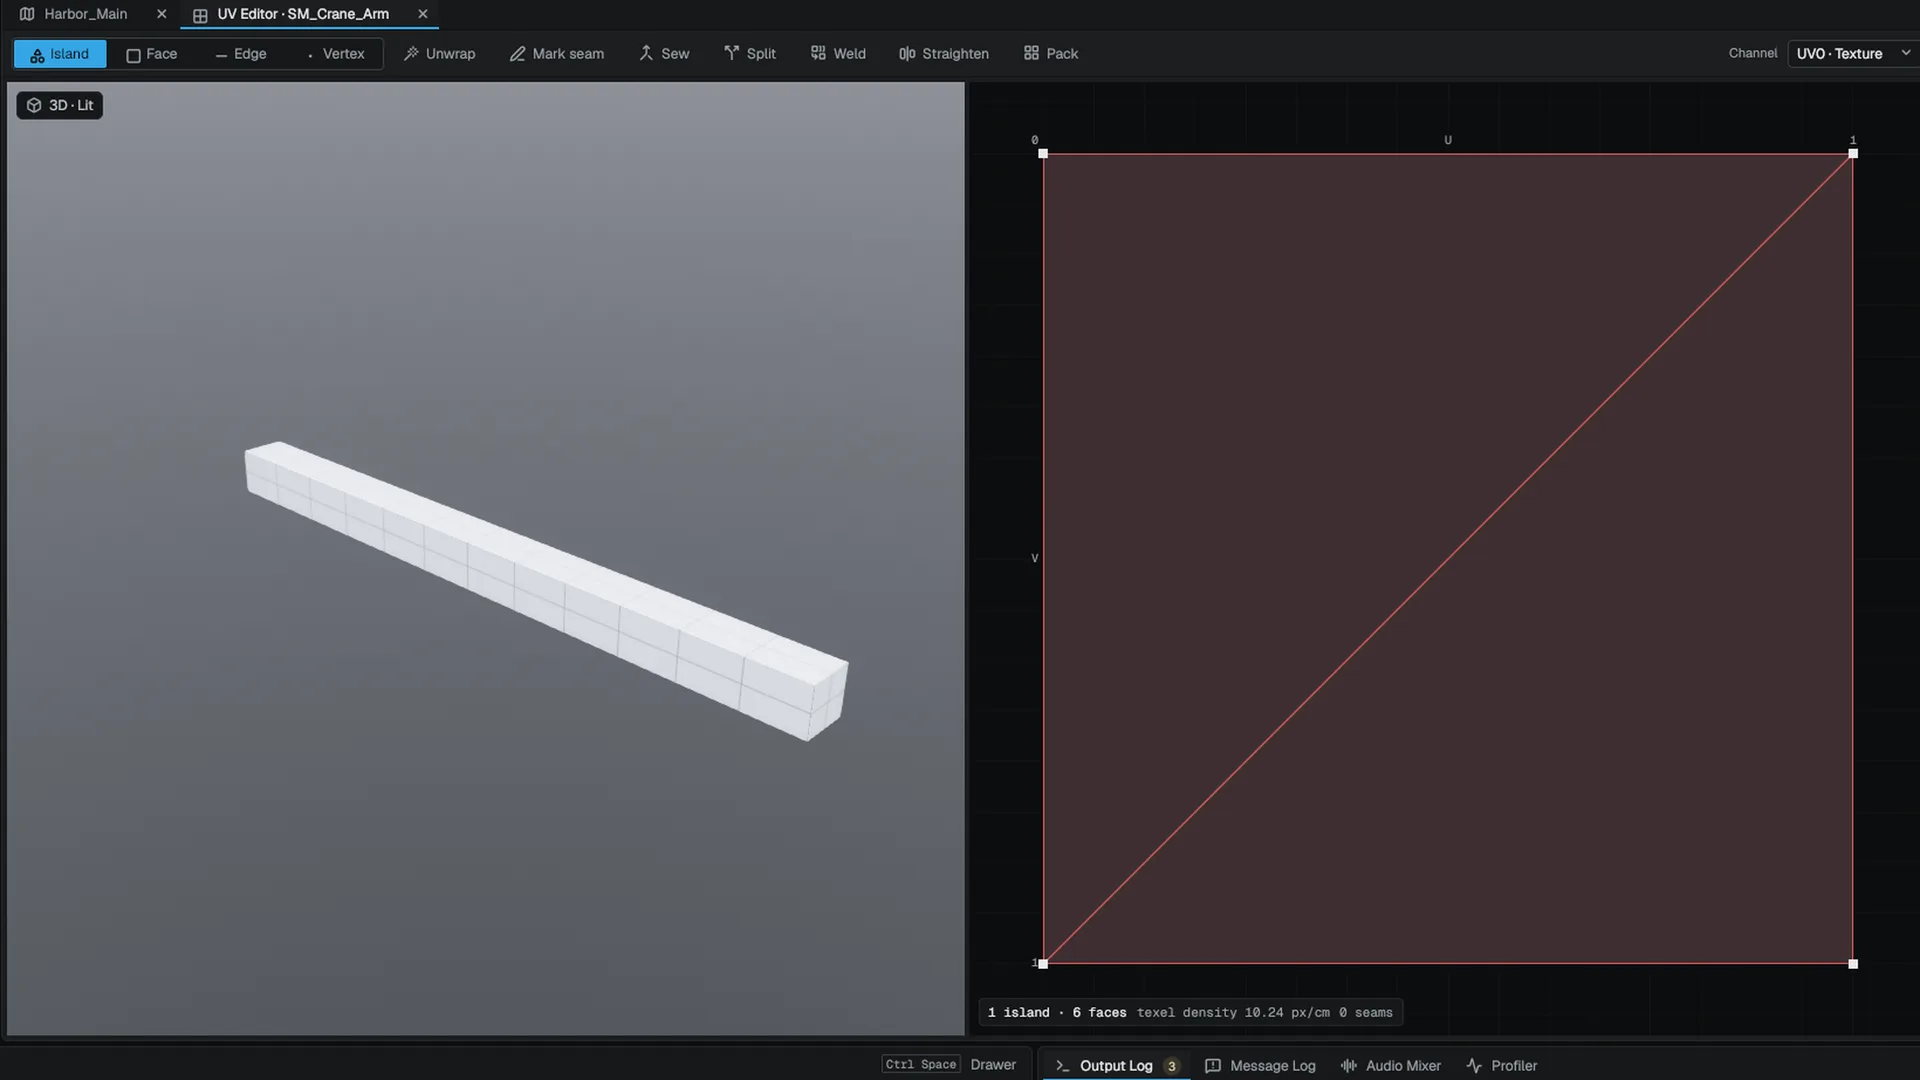
- The toolbar picks Island, Face, Edge or Vertex selection and runs Unwrap, Mark seam, Sew, Split, Weld, Straighten and Pack. Channel switches between UV0 · Material and UV1 · Lightmap; every operation writes only the active channel.
- The left half shows the mesh lit in 3D (orbit with the left button, pan with the right, wheel to zoom); the right half is the UV canvas.
- While the document is in front, the mode column holds the UV tool grid (Unwrap, Seams, Edit and Layout groups) and the Details well gains a UV channel tab: channel, lightmap channel, texel density in pixels per centimetre, background (checker, texture or none) and display of seams, overlaps and stretch.
A face is Auto (UVs computed from the projection) or Manual (one stored UV per corner, which unwrap and drags write). Dragging a corner of an auto face converts it without moving anything. Lightmap builds UV1 for the whole mesh from UV0, repacked so islands do not overlap, as one undo entry.
A source model (.obj, .fbx, .gltf) opens read-only, because there is no asset of its own to write UVs into.
Collision
Generate Collision on the component (on by default) keeps a mesh collider and a static rigid body in step with the topology, so a room built with these tools is walkable in Play without extra steps.
Saving and baking
The component is reflected, so its parameters and material paths appear in Details and save with the level. An unedited shape saves only its parameters; an edited one also saves its topology Engine/Source/Runtime/GeometryTools/Public/GeometryTools/EditableMeshComponent.h.
Export (the Output group) bakes the current geometry to a cooked mesh under Content/Geometry/. The bake builds meshlets and a mesh distance field, as an imported model gets at cook, so the piece contributes to Global Illumination. The editable form stays, so you can keep editing and re-bake.
Engine sources
This page describes behavior implemented in these files of the engine repository, checked against commit 08e26df3d.
- Engine/Source/Runtime/GeometryTools/Public/GeometryTools/EditableMesh.h
- Engine/Source/Runtime/GeometryTools/Public/GeometryTools/EditableMeshComponent.h
- Engine/Source/Runtime/GeometryTools/Public/GeometryTools/GeometryShapes.h
- Engine/Source/Runtime/GeometryTools/Public/GeometryTools/GeometrySnap.h